Friday, April 30, 2010
Glass Tile Necklaces
I did this project with my MOPS group this year and it was a big hit. It is not difficult to do and doesn't take much time. My necklace says "Mother" in Korean writing called Hangul. You could put anything on them you want. Photos, scrapbook paper, or even graphics you can buy pre-made. They make a great gift or a great addition to you own jewelry collection.
What you need:
7/8" glass tile
Bottle of diamond glaze (a little bit goes a long way)
Medium bails (I used silver)
(for the three items above I like using this ebay seller.)
Chord or chain or ribbon of your choice. (The one pictured I got in bulk off of an ebay seller in China but not all sent, fit in the medium bail so caused some trouble.)
Scrapbook paper, photo, or pre-made graphics
7/8" craft punch
Q-tips
Card stock
How?
If you want to make one like mine with words you can create a word file and print your message off on scrapbook paper.
Use the 7/8" craft punch to punch out your design of choice, photo, graphic, scrapbook paper, etc.
At this time also punch out another 7/8" square out of card stock.
Take your 7/8" tile and using the Q-tip spread a good amount of diamond glaze on the textured side of your tile. (some tiles have textured side to help graphics's stick, some do not) Once you have your glaze covering the textured side of your tile place your graphic good side down onto the glaze on the tile. Cover graphic with another layer of glaze so that the whole graphic/scrapbook paper/photo is covered with the glaze including the edges of the graphic/scrapbook paper/photo so that it is sealed. Then place the card stock square onto the wet glaze and again cover that with glaze including all edges so that it is sealed.
Using the diamond glaze as glue, or you can use another jewelry adhesive if you wish, attach the bail to the backside of your necklace like this.
Let it dry for about 20 minutes. Then string your chord chain or ribbon through your bail and you are ready to wear.
Wheel and Axle Snack.
Sometimes you just need fast easy food to grab for your kids on the way to soccer and such. Well my crew consists of 3 kids under 5 years old. To find something they can all eat with minimal mess in the car is pretty hard. That is why I just had to post this idea. It was fun, and enjoyed my all my kids.
Buy a bag of mini bagels. We found ours at our Hy-vee grocery store and once my kids discovered them they are now a staple at our house for breakfast, snacks and sometimes meals on the go. You things with these bagels such as mini pizzas, peanut butter, or traditonal cream cheese.
But for this little idea you are going to need your choice of cheese sticks. String or Colby Jack are the favoirtes around our house but there are many kinds on the market these days.
Some of you may already know where this is headed. But if you look at this bagel what would the logical thing be to do with the cheese stick.
Very portable, fun, non messy, filling for my crew, and easy to eat in the car. They love them!
Birthday Cupcake Picks
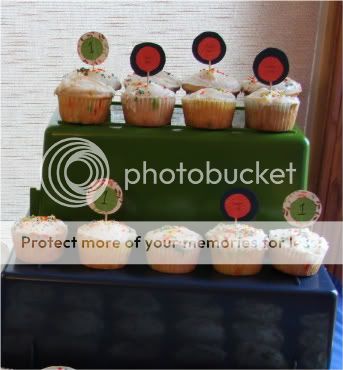
When my son turned one I decided to make our own cupcakes because lets face it a box cake mix for 99 cents costs way less than 24 cupcakes from the bakery.
But I wanted something special to put on them to help remember my sons special day. So I started looking for cupcake picks. You know the toothpick type things with something fun on the top that you stick in the middle of a cupcake.
I never found exactly what I was looking for, nothing was quite what I was looking for not to mention what people were charging for these things. I even looked on ebay!
This is when I decided to make my own. I had already decorated cupcake/fruit stands, and made a banner out of scrapbook paper for my son's birthday so why not make my own cupcake picks out of the scrapbook paper as well.
What you need:
2 different sized circle scrapbook punches (optional because you could trace and cut your own circles by hand but it takes a bit more time, my examples are done this way but I have done them with the punches and they are much faster.)
Glue stick or glue of choice
Tooth picks
Scrapbook paper
Printer (optional because you could do something by hand like the number one my example.)
How?
Make a word document with the message of choice you want on the picks in a small font, copy and paste the message multiple times and space out. Cut down the scrapbook paper so that is 8 1/2" by 11" so that it fits in the printer. Print out your words onto the scrapbook paper. Use your smaller circle punch and punch out your message.
With your larger circle punch punch out larger circles on a contrasting scrapbook paper. Sandwich one end of the toothpick between the two circles using the glue stick to hold the circles together. Let them dry then insert the toothpick end into your cupcakes!
Tuesday, April 27, 2010
DIY Bike Streamers
When my girl got her bike we got a green one. Not only was green her favorite color at the time, but also we knew we would be able to easily pass it down to her little brother because it was not a "girl's bike". Yet I wanted it to be a little bit girlish for my girl, so we decided to look for some bike streamers. Well... I couldn't believe the prices they wanted for these plastic pom poms. It was hard to find any under $5 and I thought to myself.. I bet I can make these.
So I searched the Internet to see if anyone had done it before and sure enough I found a tutorial which of course I cannot find today for the life of me, but that is ok, because I know how to do it now. Like riding a bike I guess.. You never forget how.
What you need:
Two drinking straws
Two rubber bands
scissors
Plastic bag of choice.
How?
Cut your bag into long strips.
Lay the strips together in a pile and find the middle.
Fold a straw around the middle of the bag strips so that they are pinched at the v part of the straw.
Secure the straw around the strips with a rubber band.
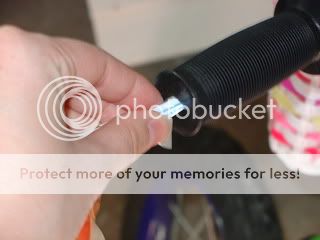
Insert straw ends into the hole in the end of handle bar grips. I was able to get the rubber band in the grip hole as well so it was very secure. Trim to whatever lenghth you like. Then you are ready to ride off into the sunset.
Monday, April 26, 2010
Easy Baptism Cake
Dinosaur Cake
Of course since my oldest boy is turning three this week I am busy posting how to's for all his cakes so far.
This was his cake for his second birthday. So far it is my favorite cake I have made I think. I am not a cake maker by the way just a do it yourself mom so I don't strive for perfection, just fun.
I searched and searched for an easy dino cake and finally found what I was looking for here.
But.. I was having a double party for my son and my daughter since their birthday's were so close and only inviting relatives so I didn't need two full cakes. So I made my own pattern, keeping the other cake in mind, using only one round cake.
Here is the pattern I came up with.
I assembled the cake sort of like this, to give you an idea. (Sorry, I'm not a graphic designer either.)
I decorated it with frosting colored neon green with neon food coloring and used Hershey kisses for his spikes like the video link showed. I piped on some brown spots with brown chocolate gel icing as well and a chocolate chip for his eyeball.
It was a hit of course.
Happy Birthday Buddy!
Dump Truck Cake
This was my older son's first birthday cake. We really didn't have a theme for the party but this was just too easy and cute not to do.
What you need:
Small Toy Dump Truck
2 Round Cake Pan
Chocolate Frosting
Crushed Oreos
Crushed Graham Crackers
Box cake mix of choice
How I did it.
Cook box cake mix in round pans according to package instructions.
Take one cake and frost it with chocolate frosting and top with cookie crumbs and graham cracker crumbs.
Take some of the second round cake, crumble it up and fill dump truck with it and come cookie and graham cracker crumbs to make it look like dirt.
After singing Happy Birthday I took the truck off and put it in front of him!
My little boy turns 3 this week!! Happy Birthday!
Friday, April 23, 2010
Girls Tie Strap Dress from Halter Top
I was out thrift shopping one day, which those who know me know that that is a regular occurance, and came across this halter top. It spoke to me.. Honestly..
It said "Save me from being this somewhat reaveiling article of women's clothing, and turn me into something beautiful!" And here is how I did it.
See this ring of fabric located in the gathered clevage area of this top? I cut off. It was the only thing keeping the fabric in that area gathered. So I spread it out flat. I also kept the long piece of strap that was origionally for tieing the shirt around the neck of the person wearing it. I will get to that later.
The next step was to turn the now flat tube like shirt inside out. Placeing it on my daughter I gathered the extra fabric on both sides and pinned it in place until it fit to her size. Then I took it off her and sewed along the pin line. Then I kept going out at an angle until I met with the side seam on the skirt.
Now learning from last time I turned it back right side out and fit it on my daughter to insure it was a good size, before I trimmed off the extra fabric on the inside.
Then all that was left were the straps. I decided to go with tie shoulder straps for a few reasons. The biggest reason is with tie straps you don't have to measure the correct strap length, because you can tie them shorter or longer as you need. I took the long tie and cut it into four pieces. I took one end of each peice and tied a knot to keep it from freying. Then I placed the flat end of each strap into the dress while my daughter was wearing it so I knew they would be in the right place. Then I stiched them on and it was done!
I think much improved from the halter top! I was very impressed myself!
My daughter LOVES it!
Twirls great too!
Thursday, April 22, 2010
Mini Candy Bar Smores
Sometimes a fantastic creation is born out of necessity. We broke down and bought a small fire pit for our backyard. We got tired of smelling the smoke from all the other firepits in our neighborhood so figured if you can't beat them join them and honestly the smoke smell is not nearly as bothersome when you are the one making it.
Well what is a fire without smores? We had the marshmallows, the gramcrackers, the roasting sticks... but no Hershey's. See... I have a tendency to devour all chocolate that is in our house so the bars of chocolate that were to go with the marshmallows and graham crackers were gone long before we had a fire pit.
Lucky for us my daughter had been to a birthday party the day before and they had filled their pinata with bite sized chocolate candy bars these included, Milky Way, Snickers, Three Musketeers, and Twix. I am not talking the Fun size for Halloween, I am talking the ones even smaller than that. The ones that are about the size of the tip of your thumb, not your whole thumb. Funny I can't show you a picture of what I am talking about because... once again I ate them all. :(
So anyway... we used these mini bite sized candy bars for our smores that night and honestly it was better than normal smores!!! They were great!! The 3 Musketeers and Milkyway smooshed and melted really well better than Hersheys blocks even, and honestly I have a HUGE weekeness for all things Snickers so that of couse was my favorite even thought hey didn't smoosh as well with the peanuts.
No for those of you who have no smore making experience let me give you a few pointers.
When making smores you do NOT want the flames of the fire to be big like this.
The flames can easily shift and come your way when they are large so it it not a good time to go putting your hand near a fire. If you fire does look like the picture above, you need to wait until it burns down a little. You want the fire to be glowing with no large flames more like this.
Here is a closeup just for kicks.
Take the top of your fire pit before you start. If a marshmallow falls in the fire and burns it is no big deal.If it falls on the firepit cover, it is a mess!
Stick your marshmallow on the end of your roasting stick. Make sure the stick goes all the way though the length of the marshmallow. If you only stick the roasting stick in there a little bit then the marshmallow will easily fall off when the marshmallow starts to melt.
My husband and I do not like burned marshmallows, some people do like the fun of lighting their marshmallow on fire and having to blow out the flames. Us, not so much, so we do the slow rotate method until it turns a golden brown. If you get to close it will cook the ouside too fast before the middle gets warm and melty, or it may catch fire. So we watch closely for the marshmallow to start to smoke a bit and adjust cooking distance accordingly.
The kids were interested in roasting too at first with us right there of couse, but the heat can get a bit intense and they decided it was too hot. This is good actually since it can teach them how dangerous a fire really is.
So dad took over to get them just right.
Now waiting off to the side you should have one square of graham cracker waiting with a bite size candy bar on it, and another square of graham cracker nearby as well. When the marshmallow is done to your satisfaction, you will want to get it off the scewer but it is HOT!! To get it off the screwer place the marshmallow while still on the scewer on top of the chocolate bite sized candy bar. Place the second graham cracker square on top and smoosh together. While smooshing pull out the scewer. This way you never have to touch the hot marshmallow but only the graham crackers. Getting the marshmallow onto the chocolate and smooshed down while still hot helps the chocolate melt also.
Then it was time to eat...
My son REALLY enjoyed them..
Very Much..
Very Very Much..
Two Buzz Lightyear Cakes
When my dauther turned 3 she stated whe wanted a Buzz Lightyear cake. Not just any Buzz Lightyear cake for this little Buzz fan who had been in love with Buzz Lightyear since the age of 18 months, But a Buzz Lightyear riding in a Spaceship cake.
WOW that is a tall request. Yes I am creative but I would not call myself a cake decorator. But the best thing about kids cakes is that they don't have to be perfect. My cakes clearly are not, but I had fun making them anyway..
So first things first, how to find a spaceship. Well I happened across this one which is actually a rocket cake on the Family Fun site. I made my cake the same way except I didn't trim down the sides an inch like they showed. I didn't want to waste the cake, and yes theirs looks a bit better but I didn't care too much.
Now to make it more Buzz like. Buzz has caracteristic red stripes on his wings when they are opened. I used Fruit Roll up to make the stripes on the wings of the rocket.
Now to get Buzz Inside the Rocket... I found some online free coloring pages with Buzz Lightyear on them like this one. I printed out one I liked and colored Buzz in and cut him out. I placed him on some blue cardstock. (actually it was piece of a clothing gift box from The Children's Palce. It was the perfect color and I was reusing what I had.) Then I wrapped the cardstock with Buzz on it with plastic wrap to form a window so to speak. I placed it on the cake and piped black iceing around the edge of it.
The cake was a hit with all the kids that came.
Buzz Lightyear Cake #2
Skip ahead a year and my girl now turning 4 was still Buzz crazy. So another Buzz cake was requested. This time we didn't as much cake that year so I made this one.
I used a pirex bowl and sprayed it with cooking oil. Then baked the cake inside the bowl. When it was done I turned it onto the plate and decorated it to look like a planet. I used neon green food coloring to color white frosting. I used different sized cups we had in the house to make crators in the planet surface. I origonally planned on using the paper characters taped to toothpicks. (coloring pages again) but last minute my Daugher found some characters cheep at Toys R Us that she bought with her free birthday club gift card. So she wanted to toss those on there too.
Fish Cake
There are a lot of tropical fish themed cakes out there but not too many Lake Fish, or Fishing cakes. Since my son was having a fishing birthday party for his 3rd birthday I had to think hard. I like cakes where there is not a lot of waste involved. Sure a cake mix is only 99 cents on sale but that doesn't mean that it is ok to cut most of it off and just toss away. So that was why I was excited when I discovered this idea.
What you need: One box cake mix of choice
Two round cake pans
Two containers frosting
Food Coloring
Colored paper, we used yellow and green.
Toothpicks
Tape
Chocolate chips
Black gel icing
Gummy worms
How: Bake two round cakes. Let them cool to room temp. Cut them in half and stand them on cut edge with flat bottom edges together. Frost bottom with yellow and top with green frosting. Use chocolate chip for eyes. Make fins out of paper and attach to toothpicks so that you can insert them into the cake where needed. Use gel icing to make the fish's mouth.
This will make two fish. You can put gummy worms in front of the fish so it looks like they are swimming after the worm.
The party was a sucess in more than one way!
Decorated Cupcake / Fruit Stands
When we had my son's first birthday it was important to us to have fruit displays and the look of food towers from traditional first Korean birthday parties, like the ones you can read about here. While keeping traditional Korean elements in mind I still wanted to make things myself and put our own family spin on things such as making our own towers made out of balloons.
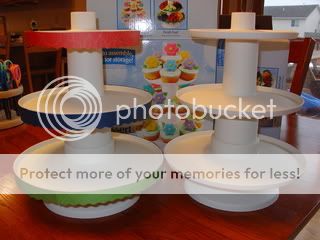
I figured one easy way i can have the look of dol towers without making them and then just tossing them after the party, was to use these dessert towers I found at Walmart. Trust me these are the best! Good sized, good price, sturdy, and the pieces stack inside each other when taken apart, so they don't take up a huge amount of space compared to other cupcake stands or towers I looked at.
I was planning on using the stands for cupcakes, until I saw the fruit displayed on them on the front of the box they came in, then decided to display fruit on them instead for the ease of serving fruit and still having it in a tower like display. Plus I had another plan for the cupcakes.
Upon looking at the towers set up I decided they were a little bit on the boring side, plain white. So I went to work.
What you need:
Double sided tape
Scrapbook paper
Funky cut scissors of choice
Drill with drill bit.
Screw
Pineapple top
How?
using your funky cut scissors of choice cut strips of scrapbook paper leaving one side flat and one side patterned.
Using double sided tape attach the scrapbook paper to the edge of the tower. I used paper that matched the party colors and I also used the same paper to make the party banner so it tied in nicely.
Much more fun to look at don't you think?
Next take the top tier of the tower and drill a hole in the middle. Take a screw and screw it up through the hole.
Cut your top off your pineapple I left a bit on the bottom that was about the same diameter as the top of the tower. Twist the pineapple top down onto the screw making sure you are turning it the right way. If the screw turns you may have to use a screwdriver to hold it in place as you screw it into the pineapple.
Fill tower with fruit right before the party and enjoy.