"You are so creative!" I have heard that phrase constantly since I was little. DIY, Refashioning, Crafting, Sewing, Woodworking. I love it all! Now I have a place to keep my favorite projects or ideas organized and share them with you!


Saturday, August 28, 2010

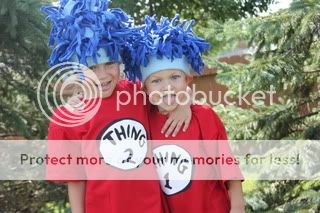
Thing One and Thing Two

Now that I have had a taste of freezer paper stenciling. I NEEDED to try this out for my nephews birthday presents. They are twins and their second birthday party is tomorrow. I know their mother is a fan of Dr. Seuss story of the Grinch but I thought there was a story that fit my two nephews a bit better.
Photobucket
The Cat in the Hat

I am sure you are wondering why I pick this Dr. Seuss story??
Well be cause of Two Things. Thing One and Thing Two.
Photobucket
Not only do they look fun an Innocent, but they totally destroy the entire house. Humm.... I think the stories I have heard from my brother sound very similar to that of these two things.

And thus the project.... For the detailed Freezer Paper Stencil tutorial visit here.

Photobucket
Lining things up.

Photobucket
Did the white first.

Photobucket
Then covered that, and did the black

Photobucket

I know they are going to be a bit big, but I hear you are in need of some new PJ's and then they can be shirts wen your grow into them. Plus this way if you want to use them for Halloween they will fit over your warm coats!

Photobucket
Maybe big sister needs to consider being the Cat in the Hat for Halloween.

Well... when I went downstairs to look for some tissue to wrap them in, I happened to see the perfect amount of Blue polar fleece and just happened to have a bag full of blue polar fleece strips that I always wondered what I was going to do with. Well isn't it obvious what I needed to do?

What would you do if it happened to you?

Photobucket

Photobucket

Photobucket

Photobucket


Photobucket
Two years ago...

Photobucket

Photobucket

Time Flies!
Photobucket

Photobucket
They are just perfect angles.


But sometimes...

Photobucket
Photobucket
Their mom and dad just may see another side...

Happy Birthday Boys! Love your Auntie!
Friday, August 27, 2010

Freezer Paper Stenciling

Photobucket

Ever wanted to print something on a T-shirt but knew if you tried it yourself it would end up like some puffy paint project gone wrong? Well worry no more! This little project is just for you.

I already have a ton more ideas running though my mind of things I want to try with this technique. I origionally found this idea in a Library book, but I also saw it at MADE. Then I knew I had to try it.

What you need:
Freezer paper (the kind with the plastic coating on the backside)
Soft Fabric Paint (I got mine at Michael's Crafts)
Foam Brushes
T-shirt, or other fabric.
Marker
Exacto knife and cutting board if your project is detailed.


How:


Choose the shape you want to print onto the fabric and print it out on your compter on regular printer paper. You can do letters, or simple shapes whatever you want. I choose this leaf. I wanted to do something a bit detailed to see how well this project really worked. Honestly simple shapes would be fine!!! Don't get overwhelmed by what I choose.
Photobucket

The smaller one, but it was a bit too detailed for a stencil so I shaded in certain parts so that it looked like this.
Photobucket

Then I took my freezer paper and placed it over the pattern and traced it.
Photobucket

So it looked like this outline.
Photobucket

I then cut out parts of the leaf leaving this. I also cut a boarder around the leaf in this case. Take these pieces and iron them onto your fabric. The plastic sticks to the fabric and provides a paint proof seal.
Photobucket

Then get out your fabric paint and paint over the open parts of the stencil.
Photobucket
Photobucket

Let your paint dry, and peel off your freezer paper to reveal your crisp image.
Photobucket

Photobucket

I used my image on a fall dress I made for my daughter out of T-shirts I got for $1 at Menard's. But to see that you need to go to THIS post.

Fall Warhol Dress

Photobucket


I used the free pattern found Here from Dana who writes MADE!

Photobucket

I used T-shirts I got for $1 from Menard's.


Photobucket

I also made pants from a T-shirt to go with the top it by using this tutorial from Dana on how to use my daughter's pants as a pattern.

Photobucket

I did freezer paper stenciling for the leaf as well. That you can read about here.

Photobucket

Photobucket

Photobucket
I think my girl is getting good at this modeling thing! :)

Thursday, August 26, 2010

Banana Cone

Photobucket

Ever have a toddler totally destroy a banana by smashing it all over. It is fun to smash bananas with your hands but it is also messy. Bananas are the one fruit I don't have to worry about my toddler choking on because they are soft, but they unfortunately end up being messy for the same reason.
So out of necessity came genius once again.

What you need:
Minni Kiddie cones (I got mine at Hy-vee)
Half a Banana

Photobucket

How:
Cut the banana in half and stick the pointed side in the mini ice cream cone. The cone becomes the perfect handle and does not involve adding many calories to the end product because these cones don't have much to them or in them.

Photobucket

I would not be hesitant to give my child a banana on a long car ride now. This has worked so well. Even the bigger kids like it!
I think the next logical step is to freeze the banana cone, then dip the end in melted chocolate then roll in crushed nuts, but that is more of a treat than a snack. I will be giving that a try though. :)

Photobucket

Linked up here:

Tuesday, August 24, 2010

Sidewalk Paint

Photobucket

You have heard of sidewalk chalk, but have you heard of Sidewalk paint??? Well maybe you have.

I know I had heard of making it, but I never tried it. I had heard the hype, but was hesitant. I think mainly because my mom had tried making sidewalk chalk with us when I was little using crushed egg shells, and well... it was a lot of work and didn't work. All that work and we were so bummed.
I figured this was one of those projects that probably didn't work that well, until my sister-in-law tried it. She gave it a thumbs up but I still didn't listen until I saw it for myself! WAY COOL!!!

Photobucket

This IS different!I wouldn't tell you to try it if it wasn't cool!
I am telling you this does NOT involve a lot of work. Plus, it just looks AWESOME!!!

What you need:
1/4 cup cornstarch
1/4 cup water
a few drops of food coloring (we used neon food coloring)
bowls or containers for holding the paint
Paint brushes (we used old toothbrushes that we keep with our paint supplies)

How:
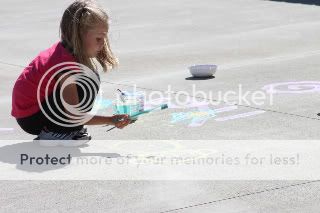
Mix the three ingredients in a small container, (empty butter dishes work well) and then paint the sidewalk with it.

It will show up just kind of wet looking to start. If it is too thick to paint with add a bit more water.

Photobucket

But when it dries it looks like this!

Photobucket

I LOVE it!


Think of all the different things you could use this for

Rummage or bake sales
School events
Church events
Holidays, Easter, Halloween, Fourth of July
Birthdays
Baby shower decoration
Welcome home signs

Photobucket

The more food coloring you use the brighter the color. Yet no matter how much you add the wet paint looks the same, the color shows up when it dries.

Photobucket

I know you are thinking "Wow this looks great but won't it stain my driveway???"

Photobucket

Nope! Washes away when it rains, or with the garden hose.

Photobucket

It's a good thing I got my corn starch at Sam's Club!

Photobucket
The artist's rendition of Buzz Lightyear complete with voice buttons and striped wings!