"You are so creative!" I have heard that phrase constantly since I was little. DIY, Refashioning, Crafting, Sewing, Woodworking. I love it all! Now I have a place to keep my favorite projects or ideas organized and share them with you!


Friday, January 28, 2011

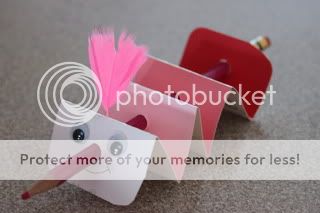
Valentine Pencil Love Bugs, DIY Valentines


Photobucket

My daughter's Valentines party is coming up soon and there was request to have a valentines craft project for the party. So today I started to brainstorm. I can think of TONS of ideas, but many are so girl themed that it is hard to find something both girls and boys would like.

With so much pink around a guy can get kind of scared. So why not add something that generally scares girls too.

BUGS!

What you need:
Paint Swatches
Hole punch
Pencils
Pipe cleaner or feathers
Pen or marker
Scissors (to trim down the paint swatch)
Wiggle eyes


I seriously considered letting the kids paint rocks like bugs, but picturing wet painted rocks traveling home in backpacks put a stop to that. So I decided to look at other free objects I had. When I went down to find my pink and red paper, I spotted my leftover paint swatches from the craft project post just before this one. So I went to work using them to create some sort of bug.

So here is what I came up with.

Photobucket


Of course the obvious fold lines work well for 5 and 6 year olds.

Photobucket

I just may have enough feathers, or I will run and get some red pipe cleaners.

Sunday, January 16, 2011

Love Notes!

Roses are Red, Violets are Blue,


Paint Swatches make Valentine Notebooks for You!

Photobucket


Tweens and teens can make and give them to their BFF’s to write secret friend messages. Or make them for the whole class.

Even grown up friends, and co-workers may find them handy to keep in their purse to jot down that phone number they need to remember.

You can also use them to write little pillow notes to your sweetheart to spark the Valentine romance.

Photobucket


What you need:

Paint Swatches

Printer Paper

Stickers

Stapler

Pencil

Scissors


Steps:

1. Use your paint swatch to measure and draw lines across your paper, the same width as the paint swatch. Cut and then cut those 8.5"strips in half. Your pages will be the width of the paint swatch and 4.25 inches tall.

2. Fold the bottom color on your paint swatch up. This makes a little pocket for your pages to fit in. I used 30 pages in my books.

3. Put your stack of pages all the way to the bottom of this fold, close the fold, and use one staple towards the bottom to secure them in place.

4. Fold the long part of your paint swatch over your pages and slide end under the bottom fold to hold in place.

5. Decorate with stickers!


Photobucket


Photobucket


Photobucket

Be My Valentine! Leave me a comment and tell me what you think!

Linking up here:


Anything Related

Monday, January 3, 2011

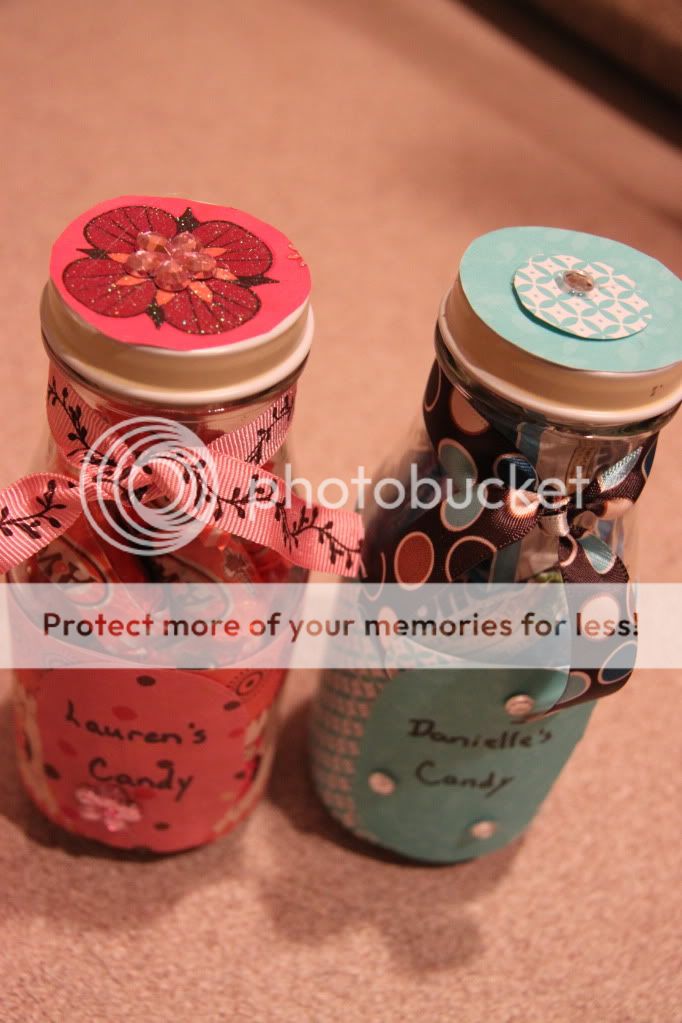
Upcycled Frappicino Bottle, Single Bottle


I wanted something else fun to add to the Christmas gifts I made for my youngest cousins. One is in second grade and one is in seventh grade.

I decided some personalized candy jars would do the trick.

I had asked what their favorite candy was that would fit in a hole the size of the circle you can make with your index finger and your thumb.

The answers were:

Almond Joy for the older of the two girls.
and
Root beer Barrels for the younger.

I thought for sure I was in trouble when I heard these choices, but our regular grocery had mini almond joy bars and they also had root beer barrels in the candy by the pound section.


I originally thought I would decorate them with whatever colors I thought, but once I got the candy in the jars I thought I better try to match the color of the candy.


I didn't think I had the paper to do so but turns out I didn't do too bad. Had to add some bling too of course and ribbon.


Really think it would be fun to to some Valentines gifts like this as well with chocolates. I would like mine filled with Dove Promises please.  I will probably have to make one for myself.


Chocolate Pizza

One of my favorite thing is when my kids come up with some crazy idea that they want to do and I go along with it. I love the feeling that I can make what is in their imagination come to life. That was the case with Chocolate Pizza.


My son was talking with his grandmother about pizza that she was planning on making the next day for our lunch. This is when my 3 year old son started running around yelling.. "Chocolate Pizza??? Chocolate Pizza??"

This is when I started turning the wheels in my brain and thought... Why not??


This is what we did. I modified a recipe for bars that a friend gave me. To make things as easy as possible I went the semi-homemade route!

What you need:
One package of Oatmeal Chocolate Chip cookie mix, (Plain oatmeal would work great too, but we only had the Oatmeal Chocolate chip on hand)
Mini chocolate chips
m&m's (We used regular size, the mini ones would be easier to cut through)
Carmel Ice Cream Topping
White Almond Bark
Pizza pan with a rim


Opened up a bag of Oatmeal Chocolate chip cookie mix. Mixed it up and put it in a pizza pan.
I honestly don't remember what came in this pan, but when I get things like this I tend to wash and save them because I know I will want them for something eventually. Today was that day. It was the perfect size and shape for chocolate pizza.


So I baked the crust just like package directions and took it out.

While it was still hot, my son sprinkled on mini chocolate chips. These will melt from the warmth of the fresh baked cookie. Once they have been on a minute or so I used a small rubber spatula to spread the melted chocolate around. This was our sauce for our chocolate pizza!

Next we needed toppings. We started with m&m's we had some from Christmas. This worked perfect, I was so happy we actually had everything we needed on hand to make this cool creation.

Then we drizzled on warm Carmel ice cream topping.

Then for  Cheese, we melted some white almond bark and drizzled that over the top. I would guess coconut would look like cheese but we don't like coconut. This was great just like this and was pretty much the same as the recipe for bars I had gotten from a friend but they made their own oatmeal crust and ours was in a pizza shape.


Then we let it chill a while in the garage actually since it is very cold around here this time of year and the garage is like a second large refrigerator in the winter months.

After dinner that night we sliced it up. It was so yummy we almost forgot to take photos. The kids have asked for it again and again days later after it was gone. I am sure we will be making this one for years to come.