"You are so creative!" I have heard that phrase constantly since I was little. DIY, Refashioning, Crafting, Sewing, Woodworking. I love it all! Now I have a place to keep my favorite projects or ideas organized and share them with you!


Showing posts with label Fall. Show all posts

Tuesday, October 11, 2011

Halloween Window #2 Spider Webs and Bats


Well we did our first window, as a Jack-0-Lantern Window then had so much fun the kids wanted to do a second window.


My daughter made a spider.

I made the web just by drawing a giant web on a piece of black poster board we had leftover from a science project. The green is a plastic table cloth from my daughter's birthday party. Yes I save everything!


Next we taped all of our shapes to the window glass and then hung the green plastic table cloth over the whole window.


Here is how it looked from the back. I just happen to have a lamp right there. I just turn one light bulb on to light it from behind uses less energy than the two in the room's light fixture and is plenty to light the window.


Again I need some tips on night photos, but here are both windows together.

Should we do some more? What color next? What image? humm...
We have one more window that is easy to reach.


Linking up here:
Tip Junkie handmade projects

Thankful Burlap Pennant Banner


The time had come to replace my old paper Thankful Banner. It had seen a few years use and since it was made of paper it was showing some wear. I was excited to see this idea for a banner that I knew will last years longer than the paper one.


First I needed some burlap. I am not one for buying new, I like to upcycle and reuse so I didn't even bother searching for burlap in a fabric store. I am not even sure if you can find it there to be honest. I lucked out and came across this for $1.


It is for potato sack racing I am guessing. There was only one so it would make for a pretty boring race. It did have frogs on the front. But the back was free from any printing. Just the exact amount I needed.


I cut them out and backed them with some muslin fabric I had. I want them to last a while and not fray. Then I did some freezer paper printing to make my letters.

I printed out a font I liked, traced it on freezer paper, cut out the letters using a blade and cutting board. Then I ironed on the freezer paper letter stencils I made, applied the fabric paint, let dry, then peeled off the freezer paper.

Next I use a large needle and some brown string to string the pennants together.


Then all that was left was to hang it up.


Now to fix and update that ugly brass on the gass fireplace...
but that is a post for another day.

Linking up here:
Tip Junkie handmade projects

Friday, October 7, 2011

Jack-O-Lantern Window


What you need:
Orange Roll Paper
Scissors
Tape

How:
Cover your window in orange roll paper tape down lightly. Cut out face of a jack-o-lantern. Secure all pieces to window with tape.


This is the inside view in mid daylight.
It glows even more in the evening when the direct sunlight is shining in.


My daughter colored in the face holes with her window markers when she got home from school. It make it just transparent enough but not translucent, but it still looks yellow from the street when lit at night. We just have our room lights on.


I have seen some done with cardboard with orange cellophane in the face holes, but this way the sun still shines though a bit in the day and turns that whole room orange and at night the whole pumpkin glows instead of just the face. Also it is still visible as an orange pumpkin in the daytime instead of brown cardboard.

We did a second window too!
That time we did a Spiderweb and Bat Window theme!


Linking up here:
Tip Junkie handmade projects

Wednesday, August 24, 2011

Five Strand Woven or Braided T-shirt Bracelet.


I was excited to find a tutorial today on how to five strand braid. I took one look at the braid and took off doing it. Then I went back and read the tutorial. and realized it was pretty over complicated instructions. I just looked at the braid and came up with a WAY easier way to do it.

Super simple I promise!

If you know how to weave simple over and under, you can do this!!


Take your five strands of whatever... I used pulled T-shirt strips, and knot them or sew them at one end. Spread them out.


Then take the strand on the right side, this is how I did it anyway... and weave it over and under the other 4 strands until it is on the left side.


Then start again with the strand on the right and repeat... Weave the strand that is on the far right over to the far left side.. over, under the other four strands.


Hop to the right repeat again and again and again. :)


Easy Peasy!


I did really like the cute headbands they made with the over complicated five strand braid tutorial I found at Make it Love it, but headbands do not stay in my hair or my daughters, they always slide out.

No big deal I really wanted a T-shirt bracelet anyway so I made my own mini version.

But do head over to Make it love it. to see how she starts and finished her headbands because that is actually how I did my bracelet and she did do a really nice job of explaining that part of the project.

Totally my favorite color. The t-shirt I used to make it I got last year at a thrift store sale, not because it fit.. just because It was my favorite color. :)


So here is my finished bracelet. Way cooler color in person by the way.

I love doing projects. I like taking photos too, but when you are your own model it makes things difficult. You always want nice pics so people like the look of your projects but honestly sometimes you just feel plain silly snapping photos of things. For example


The mirror is my friend. Ha! Got to love the backwards lettering, and it is always cool to have the camera in the shot.


No makeup today so I will cover that up. Cause everyone puts on makeup and dresses nicely and does their hair when they are hanging at home cleaning and crafting.


Then there is who knows how many shots like this that you delete just trying to take a photo of yourself.


Almost got it!

Wow look at those veins. I guess I will never be a professional hand model. Sigh.


Oh well I have a new bracelet that I really like.

To that I say.. "Forget about the pics. Cool beans!"


Linking up here:

Tip Junkie handmade projects

Monday, August 22, 2011

Buttons, Needle, and Thread, Sweater Refashions

Fall is coming!
Today was the first day of school.
Labor Day is just around the corner!!
This means a few things.

1. I needed to stay busy on the first day of school so I didn't miss my kiddo.
2. I needed to go through my fall clothes to see what will work for this fall.
3. I need to make a list of all the other things I can thrift this weekend at the big Savers Sale to complete my fall looks!

First thing you must do before you thrift shop is shop in your own closet. See what you have and what you can rework, and what you want to get rid of. So I did!

I had two other sweaters I just didn't wear much last year. They needed something. I wasn't sure what, but I was not ready to toss them either.
I decided to try some button makeovers!
Here is my button stash. Most of which came from my grandmother.

Sweater #1
It has a high neckline. It is not a sweater that can be worn without the buttons buttoned. Yet the neckline is so high that you can not really wear a necklace with it either.

 It is a cute length and a cute and interesting sleeve length and warm and cozy but boring!!
It needs some contrast and interest up top. The buttons, that blend in with the color of the sweater, HAD to go!

Just adding three different buttons makes it so much better!
I went with these little round woven leather buttons I found in my Grandma's stash.


Better? Yes! Now I just need some interesting bracelets, and a cup of hot chocolate to hold.
Never under-estimate the power of a button change!
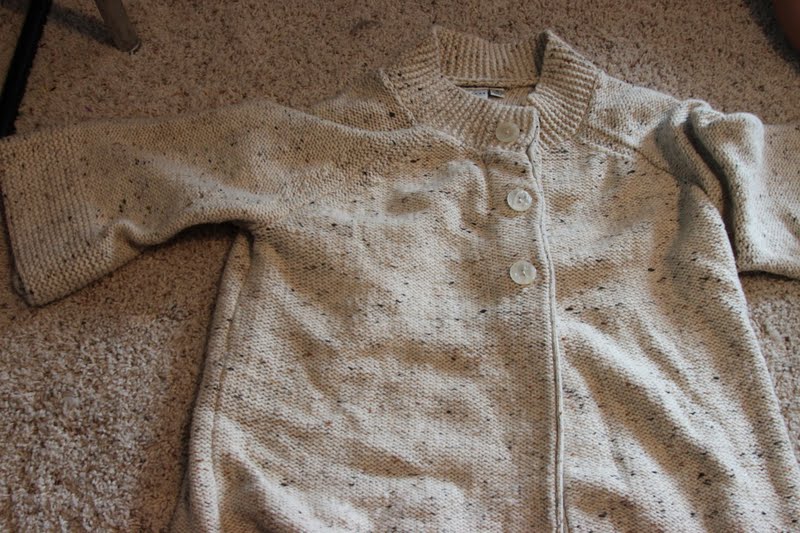

Sweater #2
This next sweater didn't have buttons.

It tied on. It tied on the inside here.

And it used to tie on the outside here too with a string on the side.
 but the string broke off.

I got it on a thrift trip last winter.
I maybe had it on twice before that string broke, but I was not my favorite sweater last year anyway so I was not in a hurry to fix it.

But now I have the time, and a plan!

Instead of a string I added a button to close the front.

I did just take it out of  the sweater box so it does have a spot or two and wrinkles that need to come out, but that was not the only thing I thought it needed.

I liked it better already, but it just didn't look finished yet.

I cut off the ends of the tie on the inside. They were longer than they needed to be. I used them to make two more button loops.

And added two more buttons.


I think the three buttons give it a bit more interest, defines the waist of the sweater taking some attention off the chest area which was the focus before, which made me a bit uncomfortable at times.
The look of it reminds me more of a coat now, a bit more military in style without being overdone,  which was very popular last fall, and I am sure the style will still be around a bit this fall as well. I just happened to be wearing the aqua top today, but I think it would look better with a dark green or plum shirt under for fall. 


Amazing what buttons, a needle, and thread can do!


Linking up here:


Photobucket


Tip Junkie handmade projects