"You are so creative!" I have heard that phrase constantly since I was little. DIY, Refashioning, Crafting, Sewing, Woodworking. I love it all! Now I have a place to keep my favorite projects or ideas organized and share them with you!


Thursday, November 25, 2010

Photo Cards Free, and Cheap.

Happy Thanksgiving everyone!!! You know what this means?? Well it means that now it is time for All things Christmas to begin. Although I have started to share a few ideas already.

Today I wanted to share what we do for photo cards. I make my own. Do I digital scrapbook??? Nope. Did I buy an expensive program??? Nope. Do I use a photo center to design them??? Nope.

I have used a free download program called Photo-Card-Maker for the last three years to make our cards. I do not work for this company and I can't even say that it is the best thing to use but it works for us. Here are the cards we did the last two years.

Photobucket

Photobucket

Someday I will figure out how to download the free templates and import them as well but after trying and trying I have yet to figure it out. That is OK I have had luck using the handful they have when you download the program. I am not too picky about our cards I honestly think many people end up tossing them anyway. So I am happy with my 19 cents each 4/6 inch print we do at Walgreen's. Although the extra templates they have are very nice looking. I just can't figure out how to get them imported.

I could turn my finished photo into sweet looking single fold cards I see at Walgreen's now. But for $1.99 per card I think I am OK with my 19 cents option.

This year I took the advice of a reader and went with the Rockin' Around The Christmas tree theme. I do actually have my own band so we have all the equipment to make the photos easy.

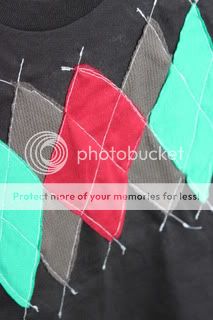
I took this photo of my son a few weeks ago for my post about the Holiday Argyle Rock and Roll Style Shirt I made.

Photobucket


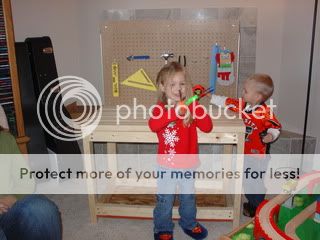
Then I thought the Upcycled T-shirts Dress I had posted about for my daughter had a nice Holiday/rock n' roll look as well with it's red and green and grey/white stripes. I had her put it back on for a photo this morning with the microphone.

Photobucket

Then my little drummer boy already had a rockin' guitar shirt and a set of drums. He was not too excited taking his photo this morning it was darn right cold outside but I this was the time I had to do it and the light was good! So he toughed it out to give me this shot. Not the greatest but honestly he looks cute no matter what he is doing.

Photobucket

Then I just uploaded the photos to the program, re-sized them with the corner adjustment thing, and moved them in place. Once you click off the photo it moves to the back of the empty space on the template. You can move them as much as you want! You can also put in any words you would like by clicking on the word boxes they have hand changing the things written there.

Photobucket

There it is! This card took me about 2 minutes and only 19 cents each 4/6 print.
Hope this helps some people save a bit of money for the holidays!

Linking up here:


Creations by Kara

Thursday, November 18, 2010

Kids Real Tool Bench

For Christmas two years ago we decided that our kids would enjoy a tool bench. We searched the toy ones and decided that we wanted something they could use longer. So we set out to build them a real one. My husband and I do enough wood working projects that we figured they could build while we were building. Here is the bench.
Photobucket

I told my husband what I wanted it to look like and even drew some pictures for him. It came out pretty much like we envisioned. The kids actually helped to build it because what fun is it to not help build your own project.

Photobucket

Photobucket

Photobucket

As you can see we built it plenty big so that they could use it for a long time to come. The plan was to make it be good for them to use all the way through elementary school.

Photobucket

Photobucket


We then filled it with tools on Christmas eve. A nice starter set that had bright colors at Menards. Now they hammer away on things while we work on our projects. All of our scrap wood goes in the bottom so they always have tons of wood to work with.

Photobucket

Photobucket

If you look closely in this photo you can see we attached a magnetic marker board on the back so our work bench doubles as an art easel as well and they can put their magnetic letters and shapes on there too.

Photobucket

Here is my daughter painting a model airplane we built. We got them a bunch of kits from Michales crafts store. They are only $1 each. They are pretty much wood glue and paint. But they are still creating something and enjoy them and for $1. I couldn't pass up those easy projects.

Photobucket

Hope you like this Christmas gift idea. I also want to say hi to the Knock-off Wood fans. I hope Anna can write this up for you guys quick. I am not so good at writting up plans. :)

Photobucket

Never too early to start a lifetime love of building!

Wednesday, November 17, 2010

The Tiny-tot Turkey Mobile

Go ahead and ask me where I got this idea and I would have to tell you it was not my idea. I had not much to do with this project at all. I was only allowed to provide materials upon demand. This is the brainchild and creation of my five year old daughter. Totally created by and thought up by my beautiful and smart little cookie!

Yep she has the project bug as well. It has been past down for four generations for sure. My mother and my grandmother were both HUGE into crafts and sewing.

So as my first ever guest blogger I would like to invite my darling daughter to the computer to tell you how she created this project.


Photobucket


I wanted to make a project and my mom said yes. I told her I needed six paper plates and crayons.
I traced my hand and my little brothers hand and my baby brother's hand and made them into turkeys. My mom taught me how to do that last year so I already knew how. My brother who is 3 years old colored his own hand. I taught him what to do. My baby brother tried to color his hand after I traced it for him but he needed me to help him finish his, he is only one.

Photobucket

I wanted a turkey on each side of the plate, so I colored 12 turkeys. It was a lot of work for me but I really wanted to do it.

The hardest part was when I traced the turkey on the back of one plate it was almost upside down from the one on the other side. This made me a bit mad, but my mom showed me if I turned the plate sideways it just looked like they were flying crooked like Turkeys fly. Turkeys are big so they don't fly so well. I even have a book called Gobble Gobble Crash that talks about it.

Photobucket

When I was done coloring the Turkeys I told my mom I needed tape and ribbon. Mom still didn't know what I was going to do and I would not tell her. She said she had some fall ribbon so I used that. I taped the ribbon to the plate. Then I tied the ribbon to the ends of the light. Mom had to help me tie the middle one, but the rest I did myself.

Photobucket

I think you should do this project because it is fun. Mom said she liked my idea because on Thanksgiving you put turkey on plates to eat them. I thought that was kind of funny to think about. Get it hand turkey on a plate and real turkey on a plate. "giggles"

If you like to draw and you have plates this is a good project for you.

Photobucket

Thank you for letting me share this project with you. I hope you like it.

Linking up here:
Katie's Nesting Spot

For the Kids Friday

Nothin' Fancy, Thankful Banner!

This is just a little banner that we have had up in our house for a few years now. I have saved it and put it back up. This is the third year. I still think it is cute and at night it casts letter shadows onto the fireplace marble. Looks pretty neat and you don't have to have a fancy paper cutter to do it yourself.

Photobucket


Used a word program and printed out the letters on to scrap paper in a font I liked. I usually go around 300 point font.

Then I just hold them over my card stock of choice and cut around them.
Just like this...
Photobucket


Then I got out a needle and used some thin silver chord I found at Walmart in the bow making section. Sewed them together and there you have it. I tossed in some leaf cut out shapes too for an extra fall touch.

Photobucket

I am thankful I can share all my projects with you.

Photobucket

You don't need a fireplace to use a banner like this. They look great hanging from a curtian rod by the window as well. :)

Linking up here:

Katie's Nesting Spot

Tuesday, November 16, 2010

Women's shirt to Girl's Yoga pants.

My daughter has decided that she can't tolerate wearing jeans. Kind of a sad day for a mommy who bought a lot of jeans at rummages this summer. They just are too uncomfortable when sitting at circle time at school.

Oh well... This means I get to make pants. Comfy ones!

I can do that!

I had already made these, and perfected the process when I made these and these. So the hunt was on for Grey and white stripes. Why?? because I saw these and loved how they pretty much go with any color combo.

Today I hit the Jackpot and found a grey and white stripped shirt that had nice long arms.

So I did this...

Photobucket


Then this...

Photobucket

and then you have it!

Photobucket


And had some leftover for the stripe in this dress.

Photobucket
And the headband??? That was the shirt's collar.

I had fun sewing today. I am good for a while now.. But I did buy some 100% lambs wool sweaters today... hehehe

Linking up here:


Katie's Nesting Spot

Upcycled T-shirts Dress

Photobucket

I fell in love with the dress I saw created here. So much so that I totally copied well.. Pretty much the whole thing down to the color scheme and paint stamping. Ha...

Sometimes you figure.. "Why mess with a good thing?"
I absolutely LOVED her choices of color.

We decided to go with dog stamps...
Photobucket

and spirals, instead of phones and lips.
Photobucket

Pretty snazzy for a bunch of thrift store shirts huh?
My catch phrase for making this dress was//
Inside out and right sides out.
The original creator of this dress connected the bottom strips first then sewed them to the top. I on the other had started from the red top and added strips one at a time.
I turned the red shirt inside out,  and then put each strip ovelapping the last, right side out, so the two wrong sides are pinned together. Then I sewed around it starting at the side seem each time. Some of my strips were the right size and would have been small if I had cut them open, (the dark grey with spots and the stripes) so those I just sewed around in a circle already.  Some were too long, so when I sewed back to my starting side seem, I flipped the strip down, I pulled the extra out to the side, so they were flat and sewed a new side seem to match the other above it, but angled it out a bit so the bottom of the strip was a bit wider. I did start on alternating side seems each time I added a strip so that the dress was not just angled out on one side.
So hard to sew a seem backwards. It goes against what your brain wants to do. You really want to put right sides together and this you have to put the wrong ones together.

Photobucket


Photobucket

Want to know about the leggings? That is the next post! :)

Linking up here:
Katie's Nesting Spot

Sunday, November 7, 2010

Argyle Rock n' Roll Style.

Photobucket

Ruffles and girly dresses are easy. What about the boys???
I wanted to do something to for the holidays but Freezer paper printing seemed a bit too been there done that. I wanted to be more creative with this black T-shirt.

Photobucket

I bought it new, and paid $1. Yep that's right! If I totally mess it up I am out a buck. I had a few other cut up shirts on hand from other projects, and noticed I had Red one and Green one. Perfect.

I also hit the jackpot at Walmart the day before and they had whole bolts of fabric on clearance for $5. I grabbed some grey thermal type fabric. I had an idea of what to do with that.

I was ready to create. I wanted something similar to the boys-upcycled shirt I made for my son earlier in the year. I also knew that a Black T-shirt didn't say Holidays too much and at the time that was the theme I was going for, so I had to have a way to make it holiday, yet cool and bad boy, but not too much "Bad" because boys that wear a size 5-6 T-shirt are still their Mommy's babies of course

Then that got me thinking of moms that dress their boys in holiday sweaters. I am guilty too of this. I always think of red argyle sweaters during the holidays so that is where my idea was born.

Photobucket

I cut out diamonds two red and one green. Then two more grey. I put the grey ones on first touching. Then the red one on top in the middle. Then touching the corners of the red I put the green down. Then I pinned like crazy.

I could have used fuseable web but to be honest it...
1) Takes too much time.
2) Comes out looking too perfect for a bad boy shirt.

I enjoy the deconstructed look and I feel it is ok to let things shift a little to make it unique. Messy is good to a certain extent when you are going for funky.

So I started sewing. I started by with the big X in the middle making sure I stitched down the grey diamonds as I crossed the red one.

Photobucket

Then I kept going with criss-crosses covering each edge and sewing a bit beyond the diamonds to keep my funky stitching going. I choose white stitches because it would stick out the most and give a nice contrast.

Photobucket

I also used the T-shirt cuffs off the red shirt inside out around the cuffs of the black shirt. Then made scrunched long sleeves out of the grey. It is cold in the winter and no one is going to want a short sleeved shirt. I actually bought this fabric for the purpose of adding it to my son's short sleeved shirts for the winter. So this was a good trial run to see how it went.

I really think that this style shirt is good for all ages. I can even see some high school aged boys diggin' the deconstructed argyle look!

Photobucket

I totally loved how it turned out.  So does my "Rock n Roll" Star!

Photobucket

To be good you must practice.

Photobucket
Practice...

Photobucket
And practice!!!

Photobucket
I may not sound too great yet, but I look good!

Photobucket

Good gig mom!

I entered this post over at MADE for Celebrate Boy!


This post was featured on:


and


Photobucket


This post was linked to:


Photobucket


Photobucket


Katie's Nesting Spot