"You are so creative!" I have heard that phrase constantly since I was little. DIY, Refashioning, Crafting, Sewing, Woodworking. I love it all! Now I have a place to keep my favorite projects or ideas organized and share them with you!


Showing posts with label MOPS Creative Activity. Show all posts

Friday, November 18, 2011

Advent Blocks Church Advent Craft


I have been wanting to make these for a few years now, so when a friend at Church asked me for a family advent craft project I instantly thought of these.

God has blessed our church and we received 2 x 4 donations and people volunteered to cut the pieces to make 200 sets for the families who will attend the Advent family event.


We cut the pieces to 8 inch, 6 inch, 5 inch, and 3 inch lengths. Each set has four blocks, one of each size.

We decided on a four block set, one block for each week of Advent. This also cut down the amount of cutting our volunteers would have to do.

We had a member of the congregation who is an art teacher draw the characters inside a rectangle that matched the dimensions of what we cut the blocks to.
 The angel and the shepard are on one block.

The star is on it's own block.

Baby Jesus is on his own block.

Mary and Joseph are on one block.


I used this easy and cheap mod podge recipe, colored pencils, craft paint and glitter for my set. I think later I might spray a coat of clear spray paint on them  too to seal everything in better so that it will last for years. But at Church we will keep costs lower and people can choose to spray them at home if they wish.
We also have scripture pieces that go along with each piece.

I will include those later. I am not sure what they are yet. That was not my part of the project.

 
I plan on mod podging the scripture to the back side of each block once I get them.


Happy Advent!

Wednesday, July 20, 2011

Book Pick Sticks

I had some friends of mine who were talking about organizing their kids books. Categories like picture books, Step reading books, chapter books etc. All in alphabetical order within the categories. "NUTS" I thought to myself.
But that might be because I have a 2 year old who would destroy any sense of order the books are in in two seconds flat!

Well... I did some rearranging this week and created a reading nook for my kids in one of the corners of the craft/sewing/wii/toy room. Yes I know lots of uses for one room. It is still a work in progress but I do want the books to stay on the shelves and in that area. One book at a time is what I would like the rule to be, so I needed a tool to help teach this.

Then I remembered the system that they use at my daughter's school.

Book Pick Sticks!

Today we got out our stamps and die some stamping...

What did we stamp?

We stopped by Ace which is just around the corner from our place and asked for small paint sticks. Who knew they came in three sizes. I figured there was just one gallon and five gallon sizes but turns out there is this little size that is about 10 inches long. Lets face it much longer and kids are going to use it as a sword, so I was excited when I saw them. Little hands, need little sticks. Perfect.


Here is what we ended up with.

Ok Allie was the only one who actually wanted to stamp the stick, the boys were more interested in stamping on paper, so they let me help them with their sticks, but they told me what to put on them.

Then I made a little container for them out of an empty fruit can and put it on top of our book shelf.

Here is our reading nook in progress. I need to hang the poster frame still and come up with some sort of colorful rug to define the space but the kids are taking to it and think it is cozy.

So how do the sticks work.???
 Well if you see a book on the shelf that you like, you put the stick in next to the book, it can be in front or behind, it doesn't matter. Then you take your book out but leave the stick sticking out of the bookshelf where the book was.
Then when it is time to put your book away... you know exactly where it goes on the shelf. You stick it back next to your stick, and moving the stick sideways actually makes more room for you to put your book back. Then once the book is back on the shelf you can remove your stick and use it to choose another book.


Using these sticks would be the only way I would ever alphabetize my kids library books. Are they alphabetized now?? No way! They are still in training. But I am hoping that the stick will help them remember the one book at a time rule, and make it easier for them to put books back onto the shelves.
We are also going to make a second set of sticks that go in each of our kids library bags for when we go to the public library. Actually... I think I will make a stick for myself as well.

Linking up here:
Katie's Nesting Spot


Tip Junkie handmade projects

Sunday, May 22, 2011

Long Sleeves to Short Sleeves No-sew Refashion


So maybe you may have heard about my new shirt. I got it on clearance at a store that is over an hour from my home.


I got it home had it on for a few hours one afternoon and these showed up...


Holes appeared... now there could be two explanations.
1. They were in the clearance because there were issues with them.
2. The Deep Cycle battery that my husband picked up at the same store, and that shared a cart with my new shirt, had some battery acid on the outside that with the help of children got onto my shirt.

Both plausible. I didn't spent much on the shirt to be honest $10. I was not about to drive an hour back to exchange it, and honestly we do not drive to this place maybe but once a year...

So....

I had to figure out a way to make it work!

I had seen a video of this refashioning technique a year ago or so and have never had a chance to try it out. I searched again for the video and could not locate it. So my bad photos will have to do.


Cut off the sleeves. You will start close to the armpit of your shirt. You will be very close to the seem. You may want to leave an inch or less. When you cut. You will angle out away from the shoulder of your shirt. So it makes a triangle type shape. Long on the shoulder and short under the arm.


Then take your scissors and cut from the long point of your triangle up to your shoulder seem. So you split the triangles down the middle.


The video also cut the collar off the shirt, to make more of a scoop neck, but I was not wanting a scoop for this shirt.


Then take your sleeves and cut two strips the length of the sleeve that are one inch wide. Once you cut the strips pull them so they turn into skinny rolled strips.


Next take your strip and thread them through the collar and out thought he slit you cut in the sleeve.

Pull them tight so they gather the fabric at the shoulder (this is what hides my holes) and tie a double knot. Another bonus idea is if you are worried about a bra strap showing.. especially if you decide to do the scoop neck route, you can always untie your strip and slide it under your bra straps to hold your shirt in place.


My shirt is saved... and I must say pretty darn cute. I will be bringing this shirt on all my camping trips this summer.


For this shirt less is definitely S'more

If anyone can find the video tutorial I saw of this project please let me know. I would love to post the link.

Tuesday, February 1, 2011

Egg Carton Framed Rose Heart

Photobucket


"Painting the roses red, were painting the roses red!"

This song came in handy for this project! My daughter really enjoyed this project and look how cute it turned out.

Reminds me of this type of fancy Valentines decore.
Widescreen Rose Garland: Heart Shape Rose Bouquet

Photobucket

What you need:
Cardboard egg carton that holds 18 eggs. (the ones that are three wide)
Red Paint
White paper
Cardboard Square
Black paint.


We cut the heart out in one piece and painted it red!
We painted a square piece of cardboard black
We put a square piece of paper onto the black cardboard piece so that it looked like it was framed in black.
Then we glued the heart in the middle of the paper.

Photobucket


Photobucket


Preschool art project style, yet with a subtle twist of sophistication. :)

Photobucket

Sunday, January 16, 2011

Love Notes!

Roses are Red, Violets are Blue,


Paint Swatches make Valentine Notebooks for You!

Photobucket


Tweens and teens can make and give them to their BFF’s to write secret friend messages. Or make them for the whole class.

Even grown up friends, and co-workers may find them handy to keep in their purse to jot down that phone number they need to remember.

You can also use them to write little pillow notes to your sweetheart to spark the Valentine romance.

Photobucket


What you need:

Paint Swatches

Printer Paper

Stickers

Stapler

Pencil

Scissors


Steps:

1. Use your paint swatch to measure and draw lines across your paper, the same width as the paint swatch. Cut and then cut those 8.5"strips in half. Your pages will be the width of the paint swatch and 4.25 inches tall.

2. Fold the bottom color on your paint swatch up. This makes a little pocket for your pages to fit in. I used 30 pages in my books.

3. Put your stack of pages all the way to the bottom of this fold, close the fold, and use one staple towards the bottom to secure them in place.

4. Fold the long part of your paint swatch over your pages and slide end under the bottom fold to hold in place.

5. Decorate with stickers!


Photobucket


Photobucket


Photobucket

Be My Valentine! Leave me a comment and tell me what you think!

Linking up here:


Anything Related

Monday, January 3, 2011

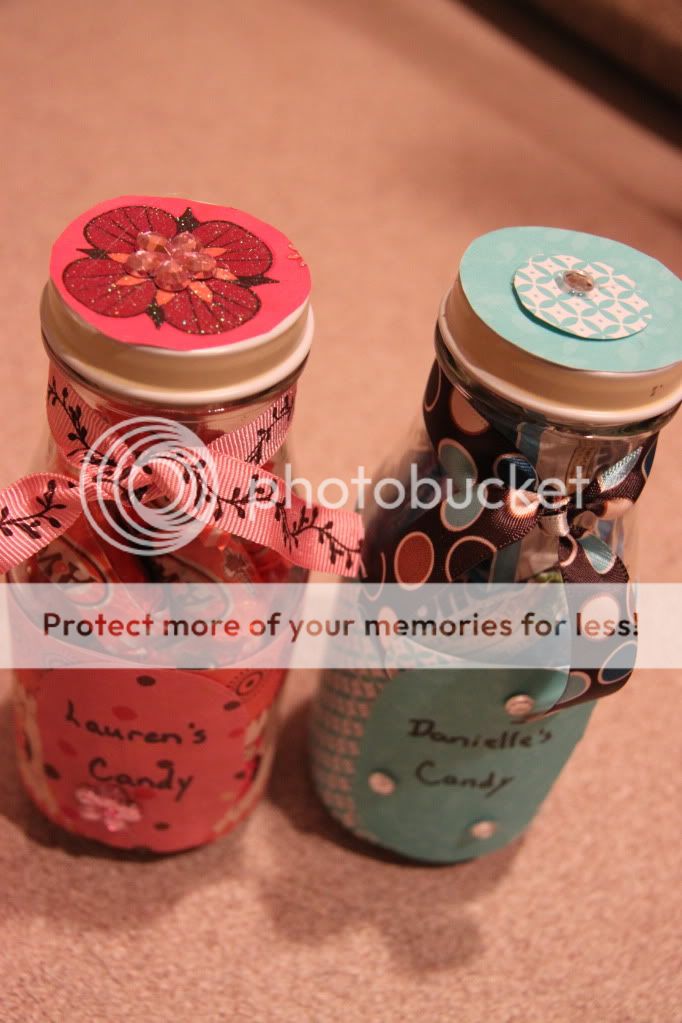
Upcycled Frappicino Bottle, Single Bottle


I wanted something else fun to add to the Christmas gifts I made for my youngest cousins. One is in second grade and one is in seventh grade.

I decided some personalized candy jars would do the trick.

I had asked what their favorite candy was that would fit in a hole the size of the circle you can make with your index finger and your thumb.

The answers were:

Almond Joy for the older of the two girls.
and
Root beer Barrels for the younger.

I thought for sure I was in trouble when I heard these choices, but our regular grocery had mini almond joy bars and they also had root beer barrels in the candy by the pound section.


I originally thought I would decorate them with whatever colors I thought, but once I got the candy in the jars I thought I better try to match the color of the candy.


I didn't think I had the paper to do so but turns out I didn't do too bad. Had to add some bling too of course and ribbon.


Really think it would be fun to to some Valentines gifts like this as well with chocolates. I would like mine filled with Dove Promises please.  I will probably have to make one for myself.


Tuesday, December 21, 2010

Classroom Holiday Project I-spy Bottles.

So many families travel around Christmas time.

So for my daughter's classroom party this year we decided to make I-Spy bottles.

Photobucket

They are a craft project..
They are a toy...
They are great to play with on long car trips..

We gathered all the little objects we could find, and then took a photo then edited it to add the text. I also punched a hole using a hole punch.
Photobucket


The classroom teacher sent a note out to all parents after Thanksgiving asking for empty plastic bottles with lids.

I bought some rice and decided to color some of it. Do this by mixing food coloring with one T of vinegar per cup of rice you are coloring. I did 4 cups of each color this time and used around 20 drops of color. Then I mixed it in a Ziploc bag and spread it out to dry on freezer paper.

Photobucket


I love colored rice, isn't it pretty!

Photobucket


Photobucket


Photobucket


Once dry I dumped it into this little tub.

Photobucket


Oooo pretty!

Photobucket


At the party the kids will each have a bottle and walk down the line grabbing one of each thing that is on the table and putting it into their bottle.

We are blessed to have 8 awesome parent helpers coming for the classroom party, so I am making use of 4 to make thing run smoothly. They all want to help in some way anyway.

We will have one parent be on colored rice duty and will hold a funnel in the bottles for the kids to put a few spoon fulls of colored rice in their bottles.

We will have another parent on white rice duty. This time the kids will hold the funnel and the parent will fill the rest of the bottle with white rice but leave an inch or two empty at the top so the rice can move.

Then one parent will be on glue duty, we are using Elmer's Nano glue, a little goes a long way since it expands.

The last  parent helper will be having the children hold a fabric square over the top of their bottles as they tie a curling ribbon around the bottle neck to hold the fabric in place and keep any extra glue off little fingers.

They will also attach the photo search card to the ribbon.

But alas I won't be there to see it happen, my youngest is sick and I am not able to leave him with  a sitter or bring him into the classroom so they will just have to go on without me. So I got the project already to go!
Photobucket

It should go well. I have detailed instruction card for each helper. :)

We also did this project for the Hood Magazine Free Make and Take and it worked out great! We had 64 kids make a bottle that day!

Photobucket

Linking up here: